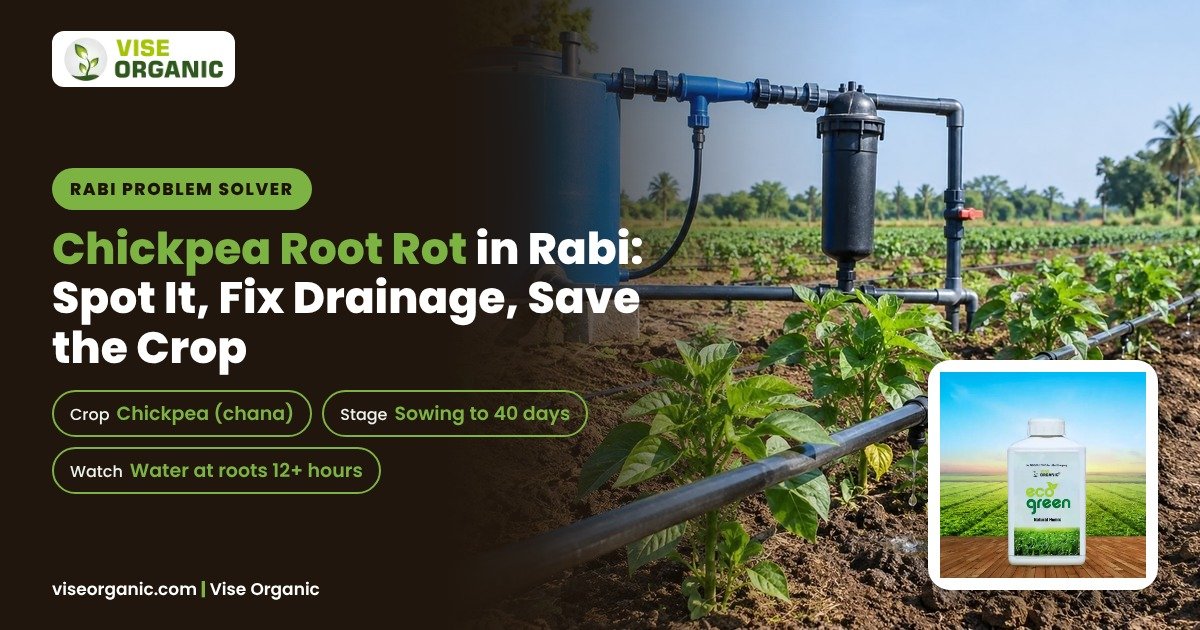
Standing in a chickpea field in the first week of December, the patch looks almost normal from the bund. The leaves are pale yellow-green instead of that deep grey-green, the plants are half the height of the rest of the field, and they look thirsty even though the soil is wet. You irrigate again, thinking moisture stress. Two weeks later the patch has doubled in size and the plants pull out with a soft, brown, empty root system. That is Chickpea root rot doing its quiet work, and the second irrigation usually helped it.
Chickpea hates wet feet more than almost any rabi crop you grow. It can forgive a lot of things in poor soil, but not water standing at the root zone for a day and a half. This guide covers what root rot actually looks like at each stage, how to separate it from wilt and from nitrogen deficiency, what to change in drainage, sowing depth and irrigation, and how to rebuild root health with compost, humate and a working biofertilizer program.
Why Chickpea Roots Rot in Rabi Fields
Chickpea is a cool, dry-season crop. Its roots want airy soil where the water films on the soil grains are thin. When an irrigation or a winter rain fills those pores, oxygen drops out within hours and the root tips stop growing. Roots starved of oxygen leak sugars and amino acids into the soil, and that is exactly the food that water moulds and soil fungi live on. They colonise the weakened tissue, and the rot spreads up the stem and down the tap root.
Three things make this far worse in most Indian rabi fields. Heavy soils in the Ganga plain and the black soils of Madhya Pradesh drain slowly and hold a flush irrigation for two days or more. Repeated tractor movement in wet conditions smears a hard pan at 10-15 cm, so water sits above it in a perched layer even when the surface looks dry. And seed sown too shallow or too deep gives a weak root system from day one, which cannot defend itself.
The pathogen is rarely the whole story. In most fields you walk, the fungus is present every year and only attacks where the soil has gone anaerobic. Fix the soil environment and the same field stops expressing the problem. That is why this guide spends more time on water and organic carbon than on any spray.
How to Read the Symptoms Stage by Stage
Root rot in chickpea shows above ground before most farmers dig. Learn to read the top of the plant, then confirm below.
In the first 15-20 days after sowing, the sign is gaps. Seed rots in the soil and germination drops in patches, usually on the low side of the field or along wheel tracks where the soil is compacted. Lift a handful of soil rather than pulling the shoot. Rotten seed has a hollow, water-soaked cotyledon and a brown, slimy radicle with no lateral roots.
Between 20 and 40 days, the patch pattern appears. Yellowing starts at the older lower leaves, the plant looks dull and stunted, and midday wilting shows even with wet soil. Pull one plant from the edge of the patch, not the middle. A healthy chickpea has a firm white tap root with fine white laterals and small pink or pale red nodules near the crown. A root rot plant has a tap root that turns brown to black for 2-8 cm below the collar, feels soft, and the outer layer slips off when you rub it between two fingers.
After 40 days, look at the collar. A water-soaked dark lesion at the soil line, sometimes with a fine white to greyish cottony growth on wet mornings, points at water mould. A reddish-brown internal stain when you split the stem points at wilt. Both kill patches, but they need different corrections.
- Patch shape. Root rot follows wet spots, low lines and wheel tracks, while wilt and nematodes show a scattered plant-by-plant pattern across the row.
- Leaf colour. Yellowing from the base upward with a dull matte finish suggests root damage, while bright uniform yellowing across the whole field suggests nitrogen.
- Root feel. A firm white root with pink nodules is healthy, while a soft brown root that slips and smells musty is rotted.
- Timing after irrigation. Wilting that appears one to two days after a watering and fades as the soil dries is the classic root rot signature.
Root Rot, Wilt or Nitrogen Deficiency
Misreading this costs a whole season, because the three look similar from ten steps away and the corrections are opposite. Feeding urea to a field that actually has root rot burns the few remaining roots. Spraying a fungicide on a nitrogen problem wastes money and leaves the real cause untouched. Dig three plants from the edge of a yellow patch before you spend anything.
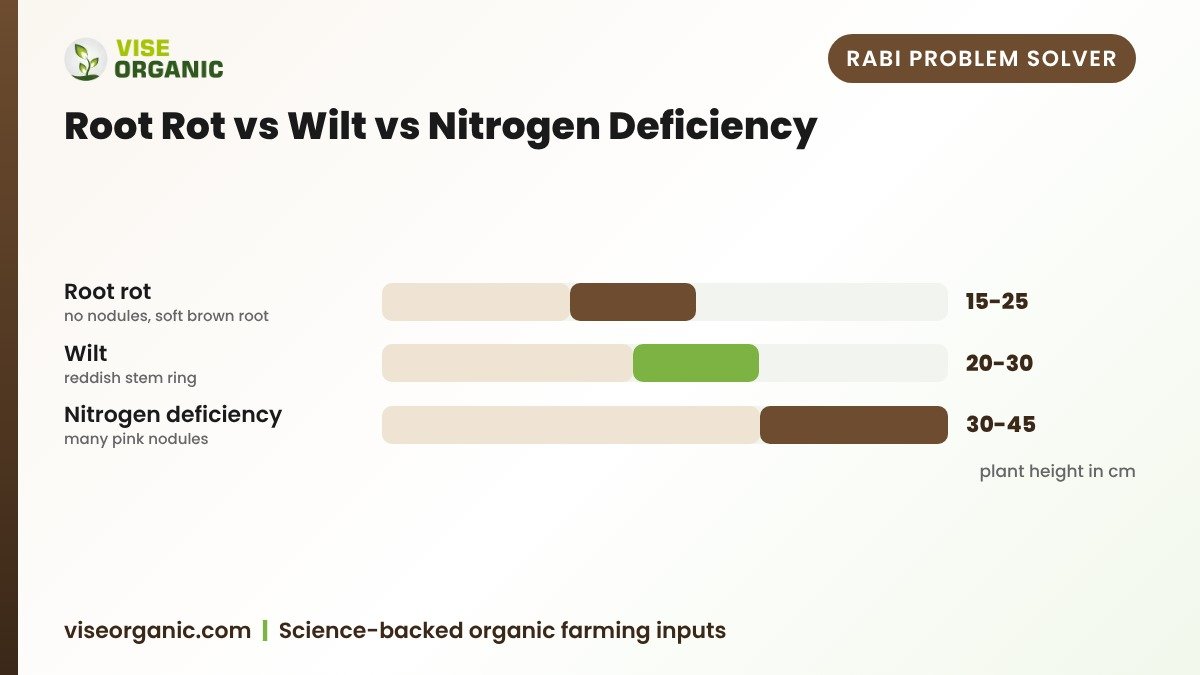
Read those numbers as rough field guides, not lab values. A root rot plant is short, 15-25 cm when its neighbours are taller, and carries almost no nodules, usually 0-3, because the bacteria never established in damaged tissue. A wilt plant is taller at 20-30 cm, still holds 5-12 nodules, and the stem shows a reddish-brown ring inside. A nitrogen-starved plant is the tallest of the three at 30-45 cm, with 12-25 healthy nodules and pale old leaves but no root damage at all. The third row tells you speed: a root rot patch can double in 10-14 days, wilt creeps in 18-25 days, and a nutrient problem does not spread at all, it just sits there uniformly.
Four Field Checks Before You Fix Anything
Do these four checks in one morning walk and you will know which corrections your field actually needs.
- Dig the pan. Push a spade or rod into the affected patch to 30 cm. If you meet a hard layer at 10-15 cm with water pooling above it, your problem is compaction and no biological product will settle that alone.
- Time the water. After the last irrigation, take a handful of soil from the patch at 15 cm every six hours. If it still feels putty-like and sticks in a ball after 36 hours, your drainage or irrigation volume is too high.
- Count nodules. Wash roots gently in a bucket and open the soil. Fewer than five small nodules per plant at 30 days means nitrogen fixation is not running and the crop lives on soil and fertiliser nitrogen alone. See How nitrogen biofertilizers fix nitrogen in soil for what healthy nodulation looks like.
- Check sowing depth. Re-measure a few rows with a ruler. Chickpea sown shallower than 3 cm or deeper than 6 cm gives weak, poorly anchored roots that rot easily.
Write the four answers down. Fix the one that failed first, not all four at once, so you can see what worked.
Drainage and Water Are the Real Treatment
Nothing else on this list matters if water sits at the roots. Chickpea on heavy soil usually needs one pre-sowing watering and then nothing until pod fill unless the crop shows genuine moisture stress in the morning.
Open the field to air before you sow. Plough to break the old pan, then form broad beds or ridges so surplus water runs to the furrows instead of sitting on the plant line. Cut two or three lateral drains from the low side of the field to the outlet before the first winter rain. On a three-acre plot near Bharatpur where I see this pattern often, the whole season's trouble came down to one flush irrigation given at 25 days for the sake of tillering, on soil that still held the sowing water.
Water at the right time of day and in the right amount. An evening irrigation on heavy soil stays cold and wet through the whole night, which is the longest anaerobic window a root gets all season. Late-morning watering on a sunny day lets the top 10 cm drain faster. Keep the flow at the furrow head low enough that water reaches the far end in 4-6 hours rather than flooding the field in 30 minutes.
- Level the field. Fill the low pockets and close the cracks before sowing, because every dip becomes a permanent patch.
- Shorten the run. Split long runs into half-length runs so the far end does not need double the water.
- Skip the extra irrigation. Any additional watering in December and January on heavy soil feeds the rot organisms.
- Clear the outlets. Trim bund vegetation and open the furrow outlets so water leaves the plot within a few hours.
Seed, Depth and the Sowing Window
Root rot losses are decided in the first ten days, before most farmers are even thinking about the crop.
Sow in the recommended window for your district, generally October for chickpea across most of Rajasthan, Madhya Pradesh, Uttar Pradesh and Haryana. Late sowing pushes root growth into colder, wetter soil, and cold soil drains slowly and infects more. Choose bold, clean, unbroken seed. Split or chipped seeds leak food to soil fungi and are the first thing to go in a wet seed bed.
Depth matters more than most operators think. Aim for 4-5 cm on medium soil and no more than 6 cm on heavy soil. Shallow seed at 2-3 cm dries out and then sits in a wet film, and the plant puts its crown in the surface layer where water mould spores swim. Seed at 8 cm exhausts its food reserve before the shoot surfaces, and the weak stem collapses on the way up.
Treat the seed properly and let it dry in shade. For a legume, Rhizobium biofertilizer is the most important single input, because nodulation is what carries the crop through a wet spell without yellowing. Use a recommended rate of roughly 200-250 ml or 250 g per 10 kg of seed as a typical label range, mixed in a plastic or steel tray with a little jaggery solution or gum, never on a bare cement floor in direct sun. Dry in shade for 2-4 hours spread thin, then sow the same day. The full method sits in our Biofertilizer seed treatment guide for rabi crops.
Give the root system a phosphate advantage from day one. A phosphate solubilizing application through seed or a PSB multiplier at the root zone helps young roots reach further for phosphorus, and phosphorus feeds root growth more than any other nutrient at this stage. Check your soil test before adding any DAP, and read Soil testing before biofertilizers if you have not tested in the last three years.
Build Soil Carbon So the Field Stops Repeating It
Drainage fixes this season. Organic carbon fixes the next five. A soil with good aggregate structure holds pore space even after rain, drains within a day, and carries a diverse microbial population that keeps rot organisms in check. That is the long answer to chickpea root rot, and it explains why two fields with the same rain and the same variety behave so differently.
Compost is the bulk material, but raw or half-rotted farmyard manure is a mistake in a chickpea field. Undecomposed dung carries high fungal loads and robs nitrogen while it finishes rotting, and it often holds the very organisms you are trying to keep down. Use only dark, crumbly, mature compost that smells of earth, worked into the top 10-15 cm before sowing.
Enrich the compost rather than only spreading it. Aged dung, soil and a humate carrier give microbes a carbon skeleton to live on while they colonise the root zone. Our Soil Carbone is a soil-conditioning product built for this organic carbon and structure job, and Eco Granule is a humic acid granule you can run with the basal dose to improve aggregation and root branching in compacted soils. In a legume rotation, a Rhizobium multiplier multiplied into well-rotted compost and applied as a root-zone dose carries the bacteria into the field, not just onto the seed.
Potassium and root strength go together. A potash mobilizing program such as KMB multiplier supports cell wall strength and water regulation, which is why potash-starved plants collapse faster in a wet spell. Our KMB biofertilizer guide for rabi sugarcane and potash explains how potash mobilizing works in rabi soils.
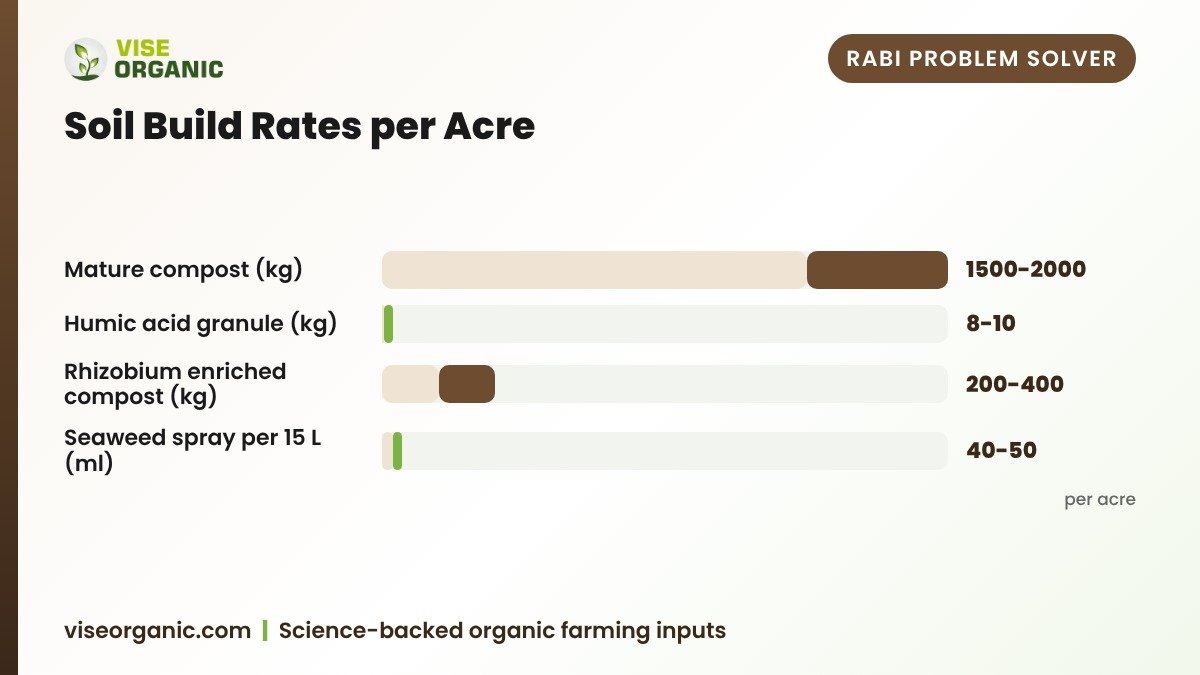
Every figure in that table is a typical published range, not a prescription. Match it to your soil test and the label on the pack you hold. The seaweed spray at 25-30 days, such as Seacure Liquid, is a root-strength and stress-holding measure for a crop that has already taken a wet hit. It is not a stand-alone solution and it will not rebuild a rotted tap root.
Drain the field first, feed it second. A root that can breathe defends itself.
Rescue Steps When the Patch Is Already There
Once you see a patch, the aim changes from prevention to limiting damage. Act in the first week, because a patch that has doubled twice is largely written off.
- Stop the water. Cancel the next irrigation for the whole plot, not just the patch, and let the top 10 cm dry to a crumbly state.
- Cut drainage channels. Open a shallow channel from the patch to the field outlet so standing water leaves the same day.
- Loosen the surface. Run a harrow or light cultivator across the patch when the soil crumbles, to reopen pores without cutting roots.
- Support the surviving roots. Apply a seaweed or potassium humate drench through the irrigation water at the label dose.
- Hold the microbial dose. Do not pour a microbial biofertilizer into waterlogged, anaerobic soil. Wait until the soil has drained and is aerobic again, or the organisms will not establish.
- Bridge the nitrogen gap. If the patch is yellowing hard and nodules are absent, a light nitrogen top dress as the label allows can hold the plant up while roots recover. Take the rate from your local agronomist, because too much burns what is left.
Do not leave pulled plants on the field edge. Remove them from the plot and cover the bare spot with a handful of mature compost so wet soil is not left exposed.
What to Check Before Buying in Bulk
Dealers and FPOs buying for a chickpea belt should ask for paperwork, not promises.
- Content and count. Ask for the declared carrier count per gram or ml for the Rhizobium and PSB lots, with the matching batch certificate from the manufacturer's lab.
- Batch documents. Every lot should carry a batch number, a manufacture date and a test report you can cross-check on the invoice.
- Packing integrity. Liquid packs must be sealed, unbulged and free of leakage, since a swollen can usually means contamination or heat damage.
- Shelf life remaining. Buy only what you will use inside the season, and check that at least six months remain at the time of purchase.
- Storage at the point of sale. Packs kept in an open sun-facing yard lose viability fast, so ask where the stock has been sitting.
- Registration and grade. For any pesticide or nutrient claim, check the CIB&RC or FCO registration printed on the label against what the dealer hands over.
Safety and Label
Read the full label before mixing anything, biologicals included. Wear gloves and a mask while treating seed and while handling any spray, and wash your hands before eating. Microbial products generally should not be tank-mixed with chemical fungicides or bactericides unless the label specifically allows it. Where a fungicide seed treatment is compulsory in your area, apply the fungicide first, dry the seed, then apply Rhizobium separately, or follow the sequence your KVK recommends. Store packs in a cool shaded shed away from direct sun, heat and diesel or pesticide stores, and keep them out of reach of children. Never rinse equipment into a pond, well or canal. For pH-related adjustment of microbial performance, our Soil pH and biofertilizers farmer guide covers the practical side.
Frequently Asked Questions
How do I know if my chickpea has root rot and not wilt?
Pull a plant from the edge of the yellow patch. Root rot gives a soft brown to black tap root whose outer layer slips off when rubbed, with almost no nodules, and the patch follows wet spots and wheel tracks. Wilt keeps a firmer stem with a reddish-brown internal ring, holds some nodules, and spreads plant by plant rather than in a wet patch.
Which irrigation timing makes root rot worst in chickpea?
A heavy flush in the evening or at night on heavy soil, because the root zone stays cold, wet and short of oxygen until the next afternoon. If a watering is needed, run it late morning on a sunny day at a low furrow flow so the top 10 cm drains within a day.
How deep should chickpea seed be sown to avoid rot?
About 4-5 cm on medium soil and no more than 6 cm on heavy soil. Shallower than 3 cm leaves the crown in the wet surface film where water mould spores swim, and deeper than 6-8 cm exhausts the seed before the shoot surfaces.
Should I still use Rhizobium if my field has root rot?
Yes, but time it right. Apply Rhizobium as a seed treatment or in the furrow at sowing into well-drained soil. Do not pour a microbial drench into waterlogged soil, because the organisms need oxygen to establish, so wait until the soil is crumbly again.
Can compost make root rot worse?
Raw or half-rotted farmyard manure can, because it carries a high fungal load and robs nitrogen while it decomposes. Use only dark, crumbly, fully mature compost worked into the top 10-15 cm two to three weeks before sowing.
Will a seaweed spray rebuild damaged chickpea roots?
No. A seaweed or potassium humate drench supports surviving roots and helps the crop hold through a wet spell, but it cannot rebuild a rotted tap root. Drainage, sowing depth and organic carbon do the actual correcting.
How soon will I see improvement after fixing drainage?
Expect the patch to stop expanding within one to two weeks once the soil has dried and re-aerated, with new white root growth visible at three to four weeks. Already rotted plants will not come back, so the aim is protecting the rest of the plot and next season.
Conclusion
Chickpea root rot in rabi is mostly a water and soil problem with a fungal signature on it. Confirm it by digging plants from the edge of a patch and checking root colour, nodule count and plant height against the numbers above, then fix the condition that failed: drainage and pan first, sowing depth and seed quality second, organic carbon and nodulation for the long term. Keeping Chickpea root rot in check takes a season of discipline in the irrigation queue, not one bottle.
Talk to your local KVK or agronomist about rates for your soil, browse Our products for the full range, or Contact Vise Organic for details and bulk enquiries. For advice on your own chickpea belt, Request a callback.
Disclaimer: This article is general agronomic information. Results vary with soil, crop, weather and practices. Always read and follow the product label and consult a local agronomist for advice specific to your field.
Article Topics & Tags:
Vise Agronomy Team
The in-house agronomy and field research team at Vise Organic Biotechnology, publishing applied research on bio-fertilizer protocols, crop protection, and sustainable cultivation practices.